VSCode Tidbits: Dank Mono & How I VSCode

I have been spending more time with VSCode lately and thought I’d add a quick update.

On the advice of Twitter and Internet developers everywhere, I purchased a font. A font. Yes, a font. It is still too early to say if it is life-changing but it does a good job of distinguishing between 0 and O and with ligatures it does a good job with displaying != as an equal sign with a slash through it – math style.

What font did I purchase? Glad you asked. Dank Mono If you think you might want a cleaner font in your editor, take a look.

That’s not all, folks. I saw HOW I VSCODE and liked how to prettied my extension list for sharing. Now, I can provide a simple link to share a visually appealing VSCode configuration with friends, colleagues, and the internet at large.

That’s it for now. Thanks for reading.

Speed Designs Mac Mini Cooling Base

A few months ago, I ended up selling my 2016 Macbook Pro and turned my backup computer, a 2018 Mac Mini, into my daily driver. With the 6-core processor and 32 GB of RAM, the little box felt snappier than my 2016 laptop which was a relief. I didn’t want to take a step down in performance while doing my daily tasks.

After a few weeks of use, I began to notice an uptick in the CPU core temperature readings. Honestly, I do not know if it is was a problem from the git-go, as I was not monitoring the temperature sensors from day one.

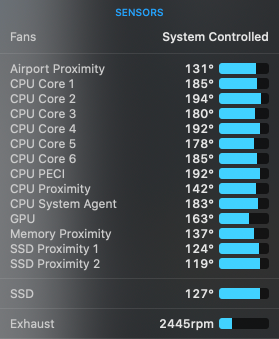
With a fairly light load, the Mac mini’s temperature sensors were between 178 degrees F - 194 degrees F. I was running the usual suspects, a few browsers with maybe 10 total tabs, Apple Mail, Slack, and Messages. I also was running Visual Studio Code with a Docker Container of my development environment.

Low-Load-Temperature

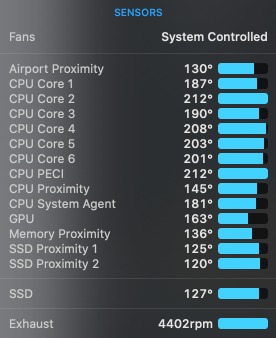
If I increased the load to include a few more containers and Windows 10 VM, I would get temperatures like the following:

High-Load-Temperature

This usage was fairly common with my previous Macbook Pro but temperatures were not nearly as high. I thought: no big deal. If the temperatures were a problem, the system would alert me or even shutdown macOS.

I never did get any system warnings, but I did get screen lockups and system crashes every few days. There were no interesting tidbits in the console logs. However, like a human fever, I did suspect the high core temperature a symptom.

I decided to look into cooling fans to see if bringing the temperature down would alleviate some of the odd system behavior and stop it from crashing. After a few Google searches, I found a company called Speed Designs which has a promising looking cooling base.

I liked how the Mac Mini would sit tightly in the mount and that it was lifted off the ground to more easily intake air from the bottom. The $149 price tag was a bit daunting, but I decided to roll the dice and order anyway.

What I received was a very solidly crafted piece of machined aluminum. I set my Mac Mini into the circular base of the mount and plugged in the USB-A cable into a free port on my Mac Mini.

Two things that I noticed. One, the Mac Mini slid around in the base. I thought that odd, but figured, I’d continue to test out the cooling. Two, the temperature barely dropped. I was deflated. I spent $149 on a nice looking paperweight.

Oops.

If I had read the instructions first, I would have noticed that I needed to take the bottom plastic base off of the Mac mini. iFixit has a good photo and instructions for its removal.

I took off the bottom cover and reset the Mac mini in the cooling base. Perfect fit; no sliding around. Aha. That is promising. I launched my usual apps again and brought up iStat Menus sensor monitor software up.

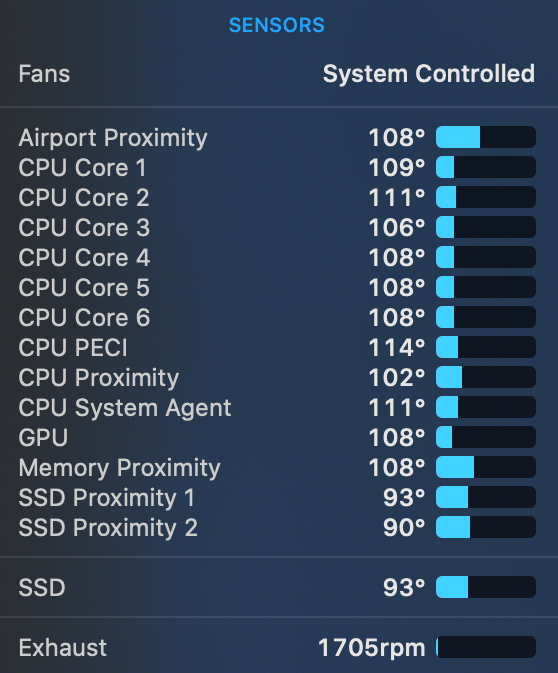
Amazing improvement. With my same load, the numbers were between 106 degrees F - 111 degrees F.

Low-Load-with-Base

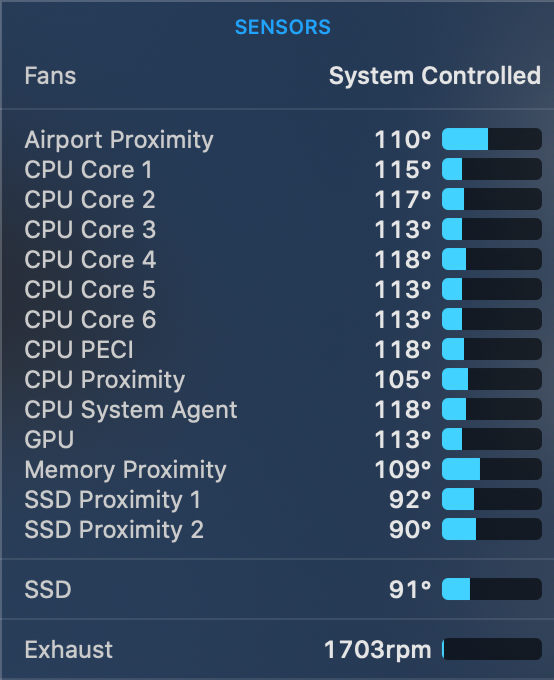
With a high load, they still stayed below 120 degrees F.

High-Load-with-Base

After using the cooling base now for about a week, temperatures have not spiked over 120 degrees F and I’ve had 0 system crashes or screen lockups.

I am very pleased with Speed Designs but disappointed that I needed a 3rd party cooling base at all.

  • aws

AWS Client VPN - It exists!

I’m not sure how I missed the announcement from December 2018. In case you are like me and missed it, too, AWS announced AWS Client VPN on December 18, 2018. Ever since I started using VPCs in the early 2010s, I’ve wanted a baked-in VPN solution for accessing resources in a VPC. OpenVPN running on an EC2 was and still is a solution, but it is a significant effort to get up and running and to maintain.

Here is my walk-through of testing the feature. As always, let’s start with a picture.
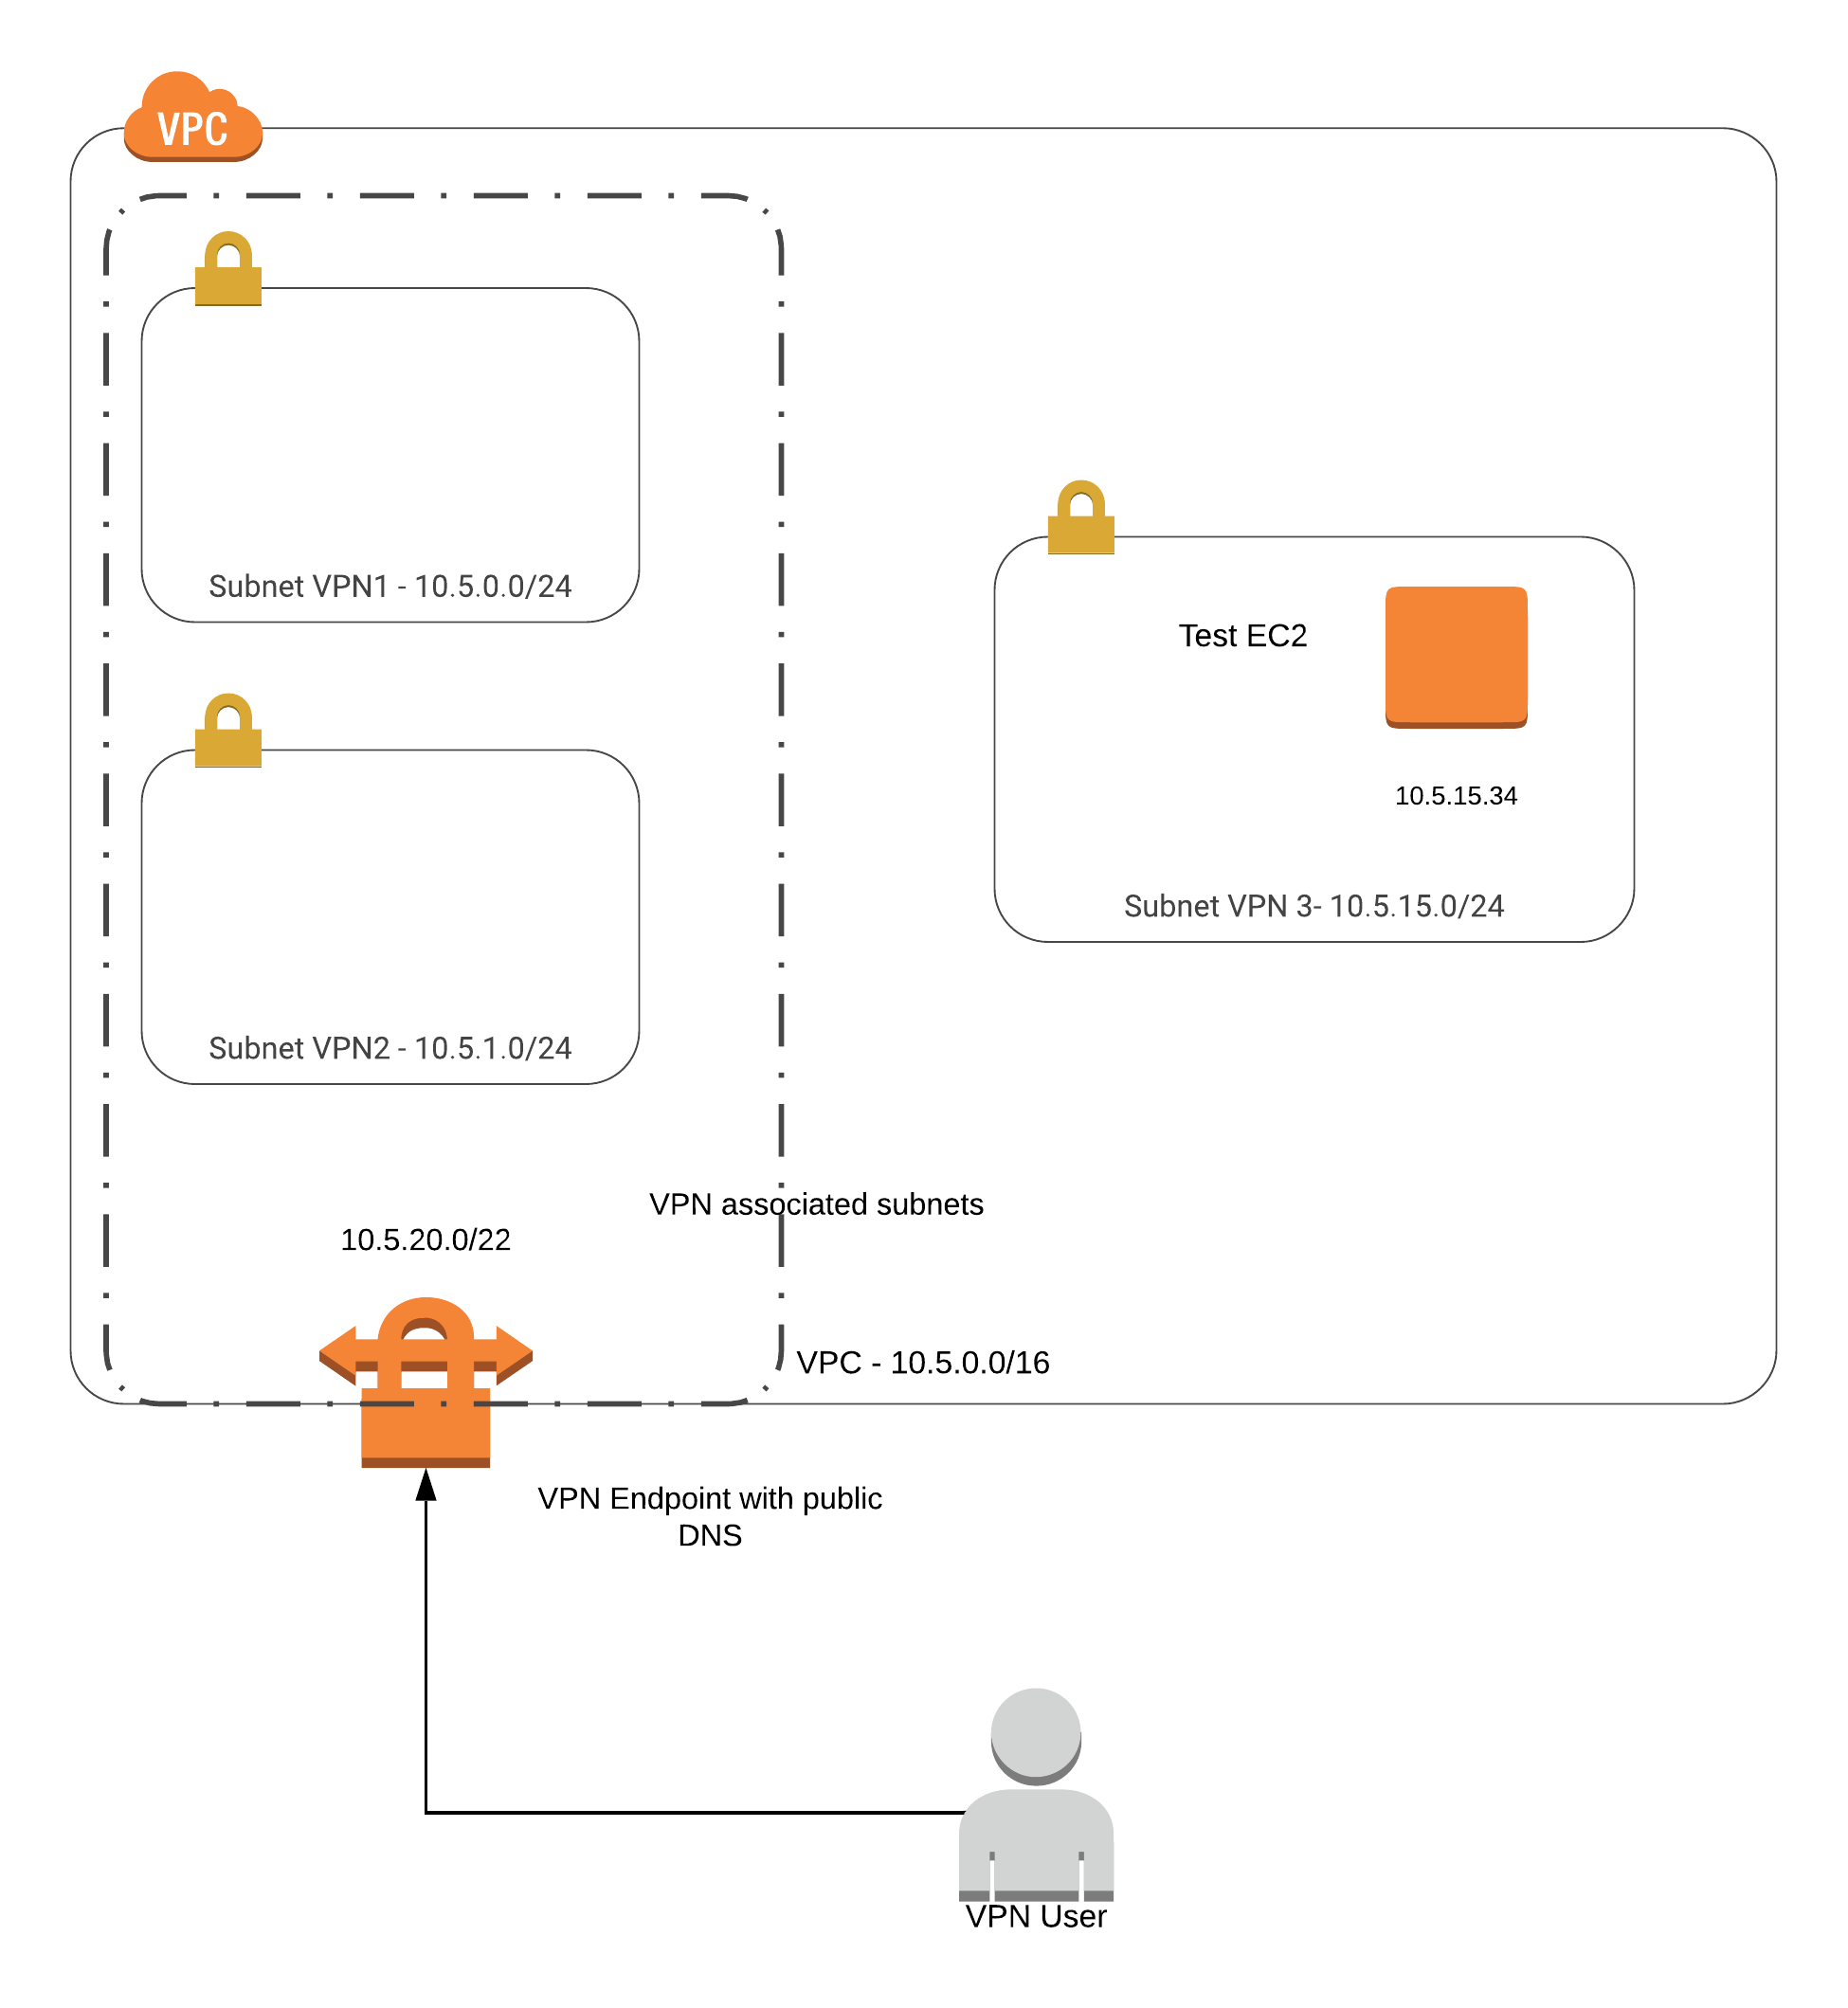
Client-VPN-Diagram

Assumptions

  • AWS account already exists
  • AWS CLI is locally installed
  • AWS access keys are set up
  • Ability to log into the AWS Console

VPC Setup

Create VPC

I start by logging into the AWS Console and click on the VPC service. I create a test VPC, calling it vpn. I set a CIDR of 10.5.0.0/16 which gives me 65536 IPs to play with. If you are like me and don’t deal with CIDR too often, try CIDR to IPv4 Conversation. It is helpful too.

Create-VPN

Create Subnets

Next, I create three subnets in the vpn VPC. I do this by clicking on Subnets in the left navigation of the VPC Dashboard and then clicking the Create subnet button at the top.

  • vpn1 with a CIDR of 10.5.0.0/24 in us-west-2a
  • vpn2 with a CIDR of 10.5.0.1/24 in us-west-2b
  • vpn3 with a CIDR of 10.5.0.3/24 in us-west-2a

The two subnets vpn1 and vpn2 will be used for the VPN Client association which I’ll get to in a bit. The subnet vpn3 will be used to host a private EC2 instance which I will use to test access to upon completing the vpn set up.

Create EC2

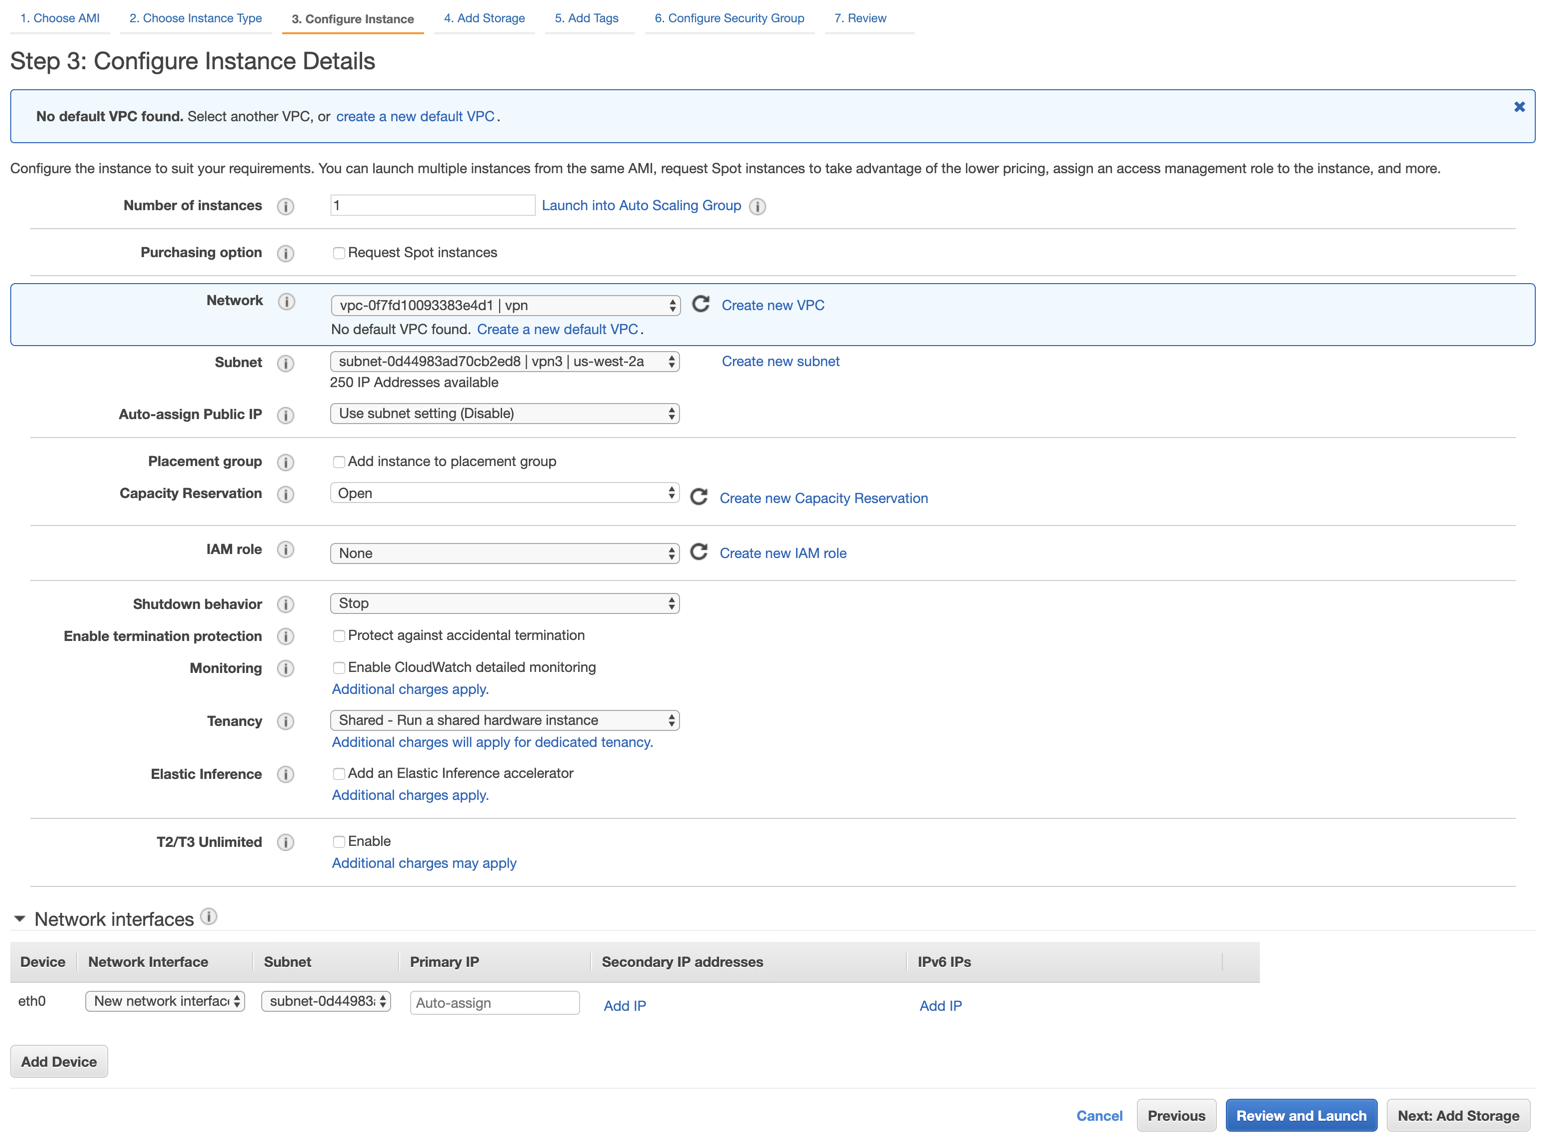
I add an EC2 to my VPC by going back to the AWS Console and clicking on the EC2 service. Once in the service, I click on Launch Instance. It does not matter what AMI base image I use for this testing. So, I pick the default Amazon Linux 2 AMI (HVM), SSD Volume Type and click Select. For the instance type, I choose the smallest, a t2.nano and click on Next: Configure Instance Details. Here I keep the defaults except for the following.

  • Network: I set to the newly created vpn vpc
  • Subnet: I set to vpn3

Create EC2

At this point, I click on Review and Launch skipping the storage and tag customizations.

Client VPN Setup

I let the EC2 spin up and move on to creating the client vpn. I am using AWS document as my guide to complete this walk-through.

Mutual Authentication and Generating Keys

It looks like the AWS VPN Client allows for two types of authentication – Active Directory and Mutual. Since I don’t have an Active Directory in my environment, I go with Mutual authentication which requires one to create public and private keys to authenticate.

To make this process simple, AWS provides a how-to to configure the keys.

AWS recommends grabbing the following github repo to generate the necessary keys.

I launch a terminal and type the following commands.

git clone https://github.com/OpenVPN/easy-rsa.git

cd easy-rsa/easyrsa3

./easyrsa init-pki

./easyrsa build-ca nopass

./easyrsa build-server-full simplyroger nopass

./easyrsa build-client-full roger.simplyroger.com nopass


mkdir ../../custom_folder

cp pki/ca.crt ../../custom_folder

cp pki/issued/simplyroger.crt ../../custom_folder

cp pki/private/simplyroger.key ../../custom_folder

cp pki/issued/roger.simplyroger.com.crt ../../custom_folder

cp pki/private/roger.simplyroger.com.key ../../custom_folder

cd ../../custom_folder

aws acm import-certificate --certificate file://simplyroger.crt --private-key file://simplyroger.key --certificate-chain file://ca.crt --region us-west-2 --profile=simplyroger

aws acm import-certificate --certificate file://roger.simplyroger.com.crt --private-key file://roger.simplyroger.com.key --certificate-chain file://ca.crt --region us-west-2 --profile=simplyroger

If you wish to run this, swap out the following parts of the above.

  • Replace simplyroger and roger.simplyroger.com with your server and client information.
  • the aws cli command aws acm … assumes the aws cli is installed and credentials are configured in the –profile=simplyroger. Change this to your profile (or remove the –profile section entirely to use the default).

After running the aws acm commands, I get back a CertificateARN= response. I note these arn’s down since I’ll need them later.

E.g.

{
    "CertificateArn": "arn:aws:acm:us-west-2:764380047232:certificate/3478a663-8927-4b93-9e11-908c7185689f"
}

At this point, I have the following files in customer_folder/ directory.

ca.crt
roger.simplyroger.com.crt
roger.simplyroger.com.key
simplyroger.crt
simplyroger.key

Create Client VPN Endpoint

Leaving the terminal, I now go back to the AWS Console to create the client vpn endpoint by choosing Client VPN Endpoints in the left navigation under the VPC Dashboard. I, then, select Create Client VPN Endpoint.

My settings are as follows:
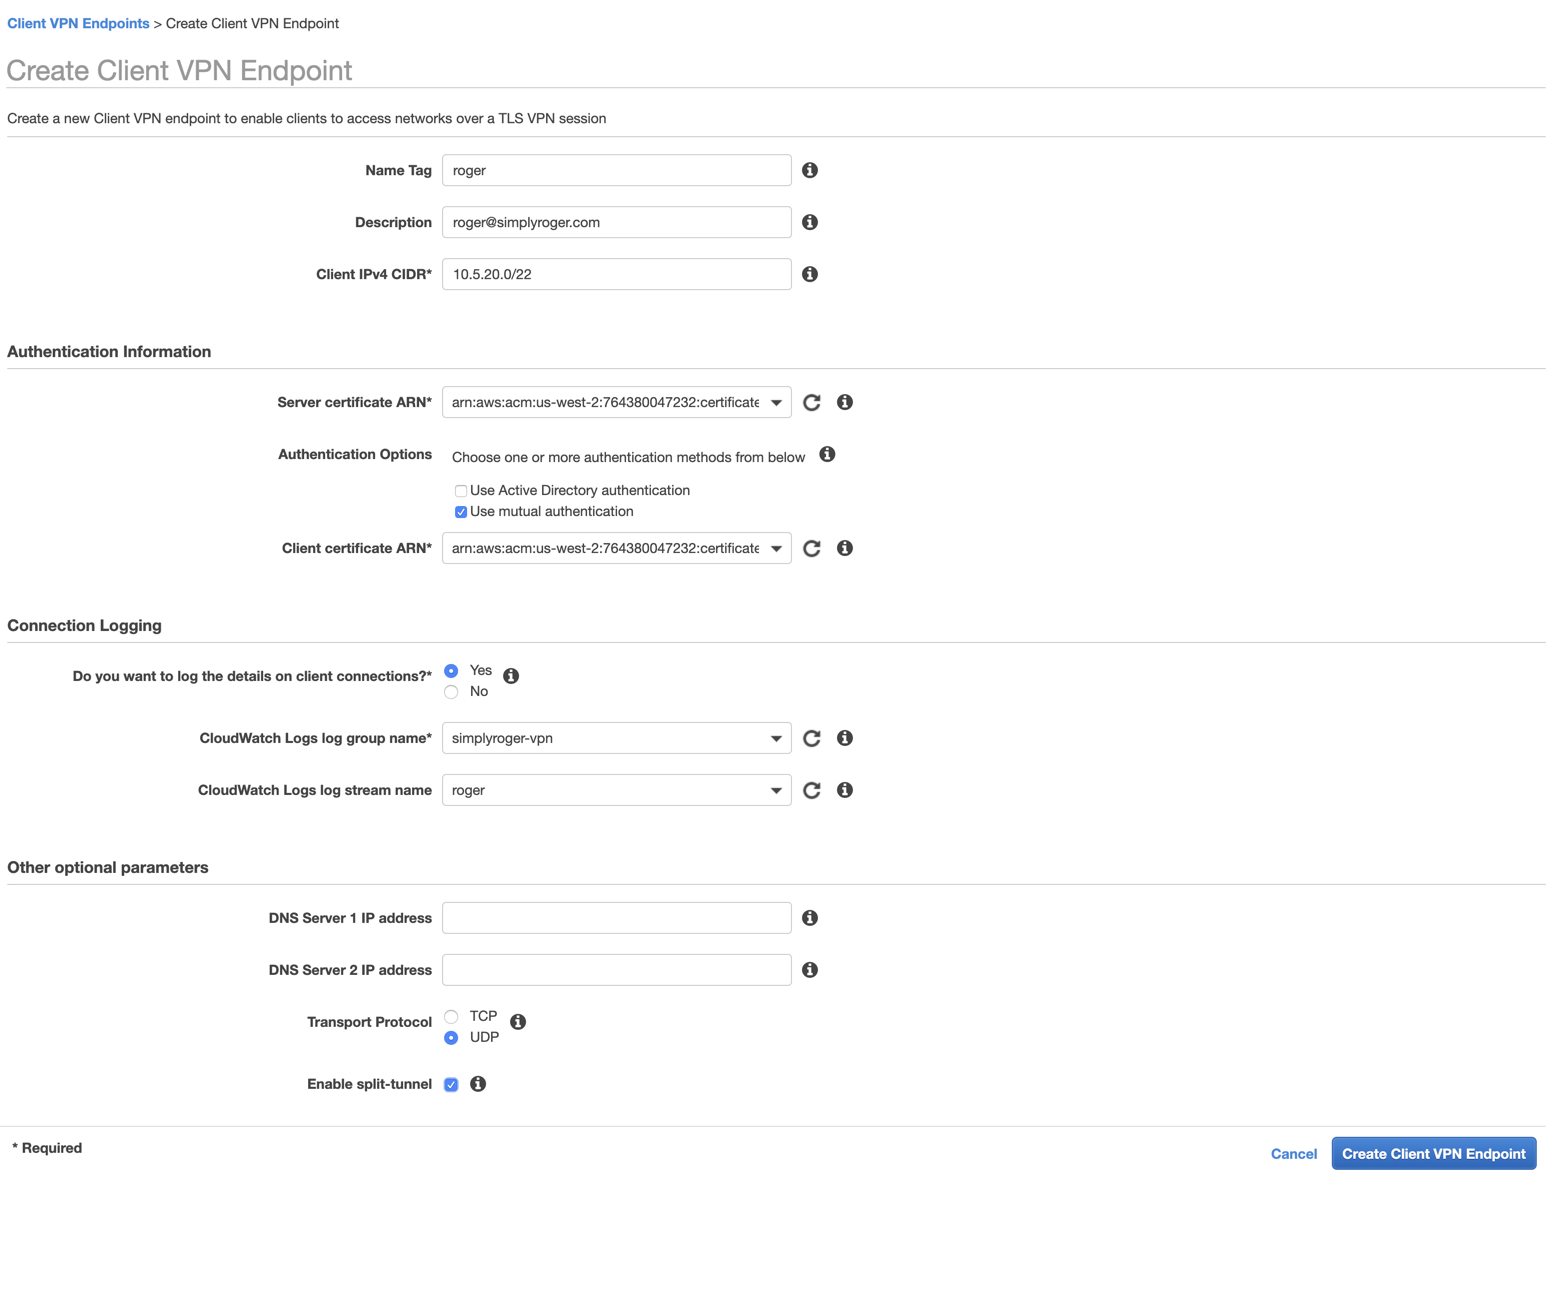
  • Name Tag: roger
  • Description: roger@simplyroger.com
  • Client IPv4 CIDR: 10.5.20.0/22
    • It is important to choose address space that does not overlap with any existing subnets. 10.5.20.0-10.5.3.255 is not within any of the subnets I set up, so this should be good.
    • The smallest address space AWS lets you choose is a /22. I’m not sure why they need at least 1024 hosts, but that is a requirement.
  • Server cetificate ARN: arn:aws:acm:us-west-2:764380047232:certificate/3478a663-8927-4b93-9e11-908c7185689f
  • Client cetificate ARN: arn:aws:acm:us-west-2:764380047232:certificate/a87485d8-6282-4bc9-a6e3-2a8097bed406

  • Do you want to log the details on client connections?: Yes
    • CloudWatch Logs log group name: simplyroger-vpn
    • CloudWatch Logs log stream name roger
  • Enable split-tunnel: checked (To allow internet traffic to not go through the VPN)

Create Client VPN Endpoint

After successfully creating, I get a pending-associate status.
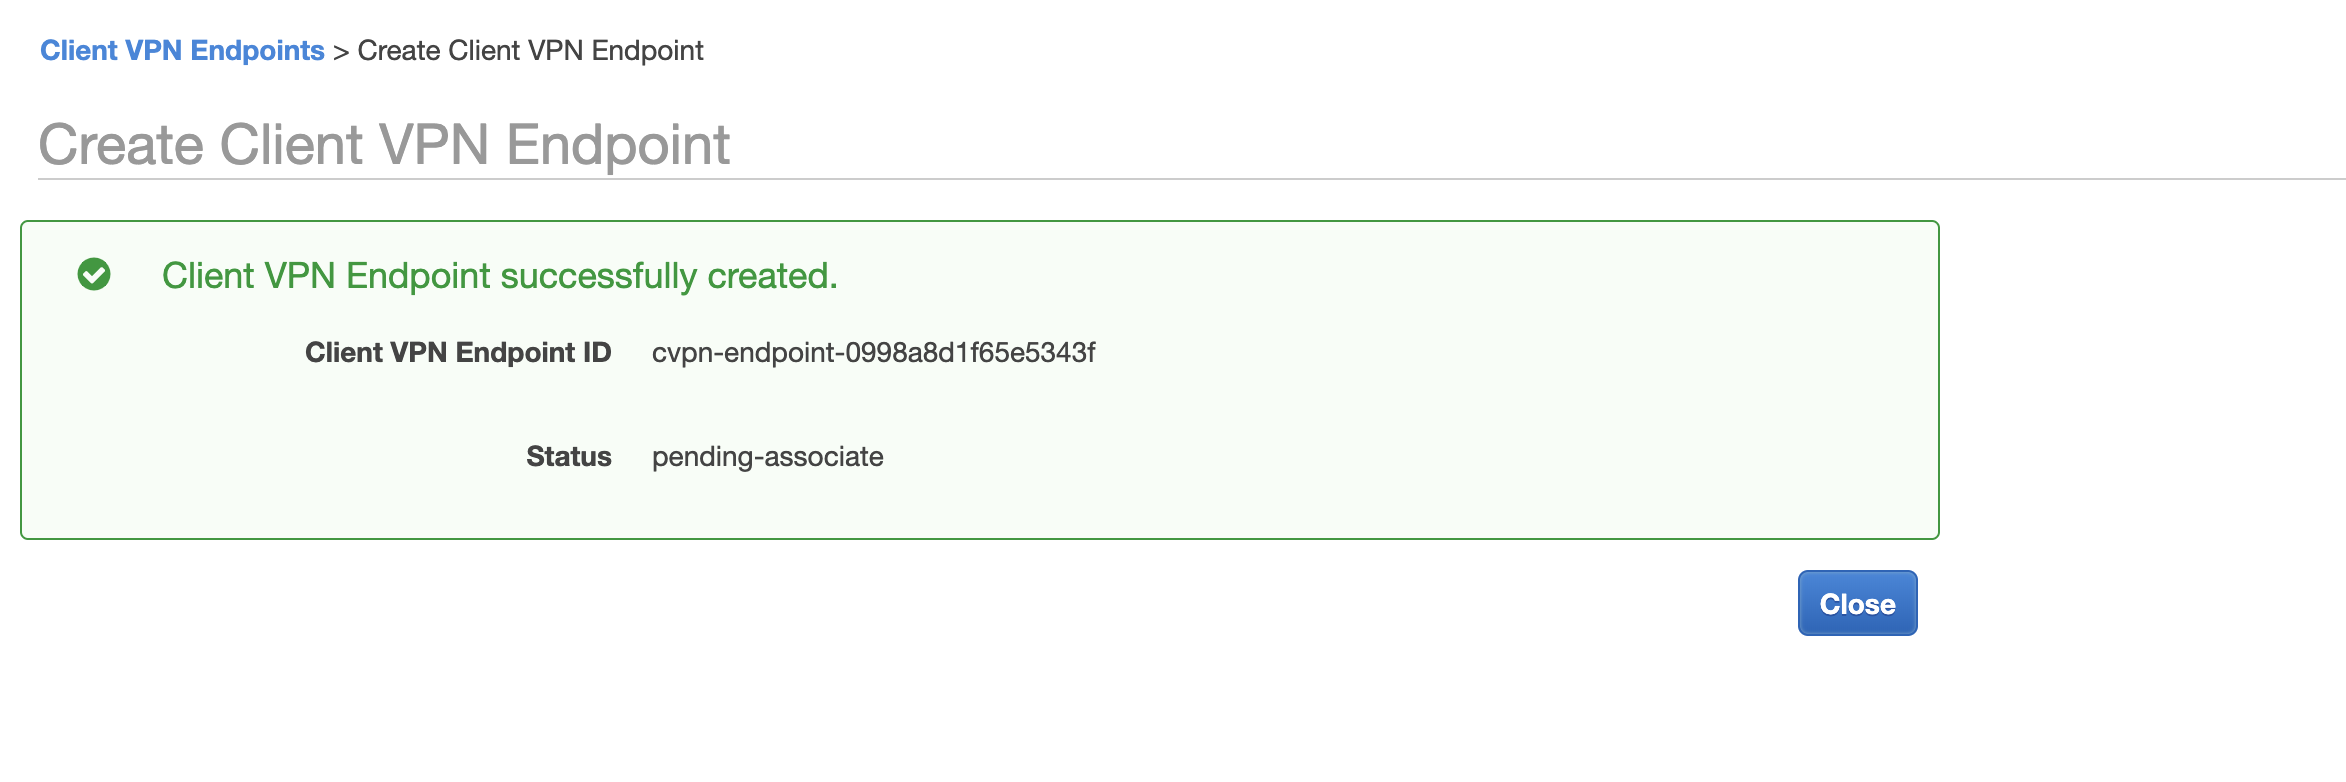
Pending Associate

To fix the pending-associate status, I click on the associations tab inside the Client VPN Endpoints screen. I, then click on Associate to bring up the Create Client VPN Association to Target Network screen. I choose the vpn VPC and the vpn1 subnet.

  • VPC: vpc-0f7fd10093383e4d1
  • Choose a subnet to associate: subnet-04ae020276cf462c2
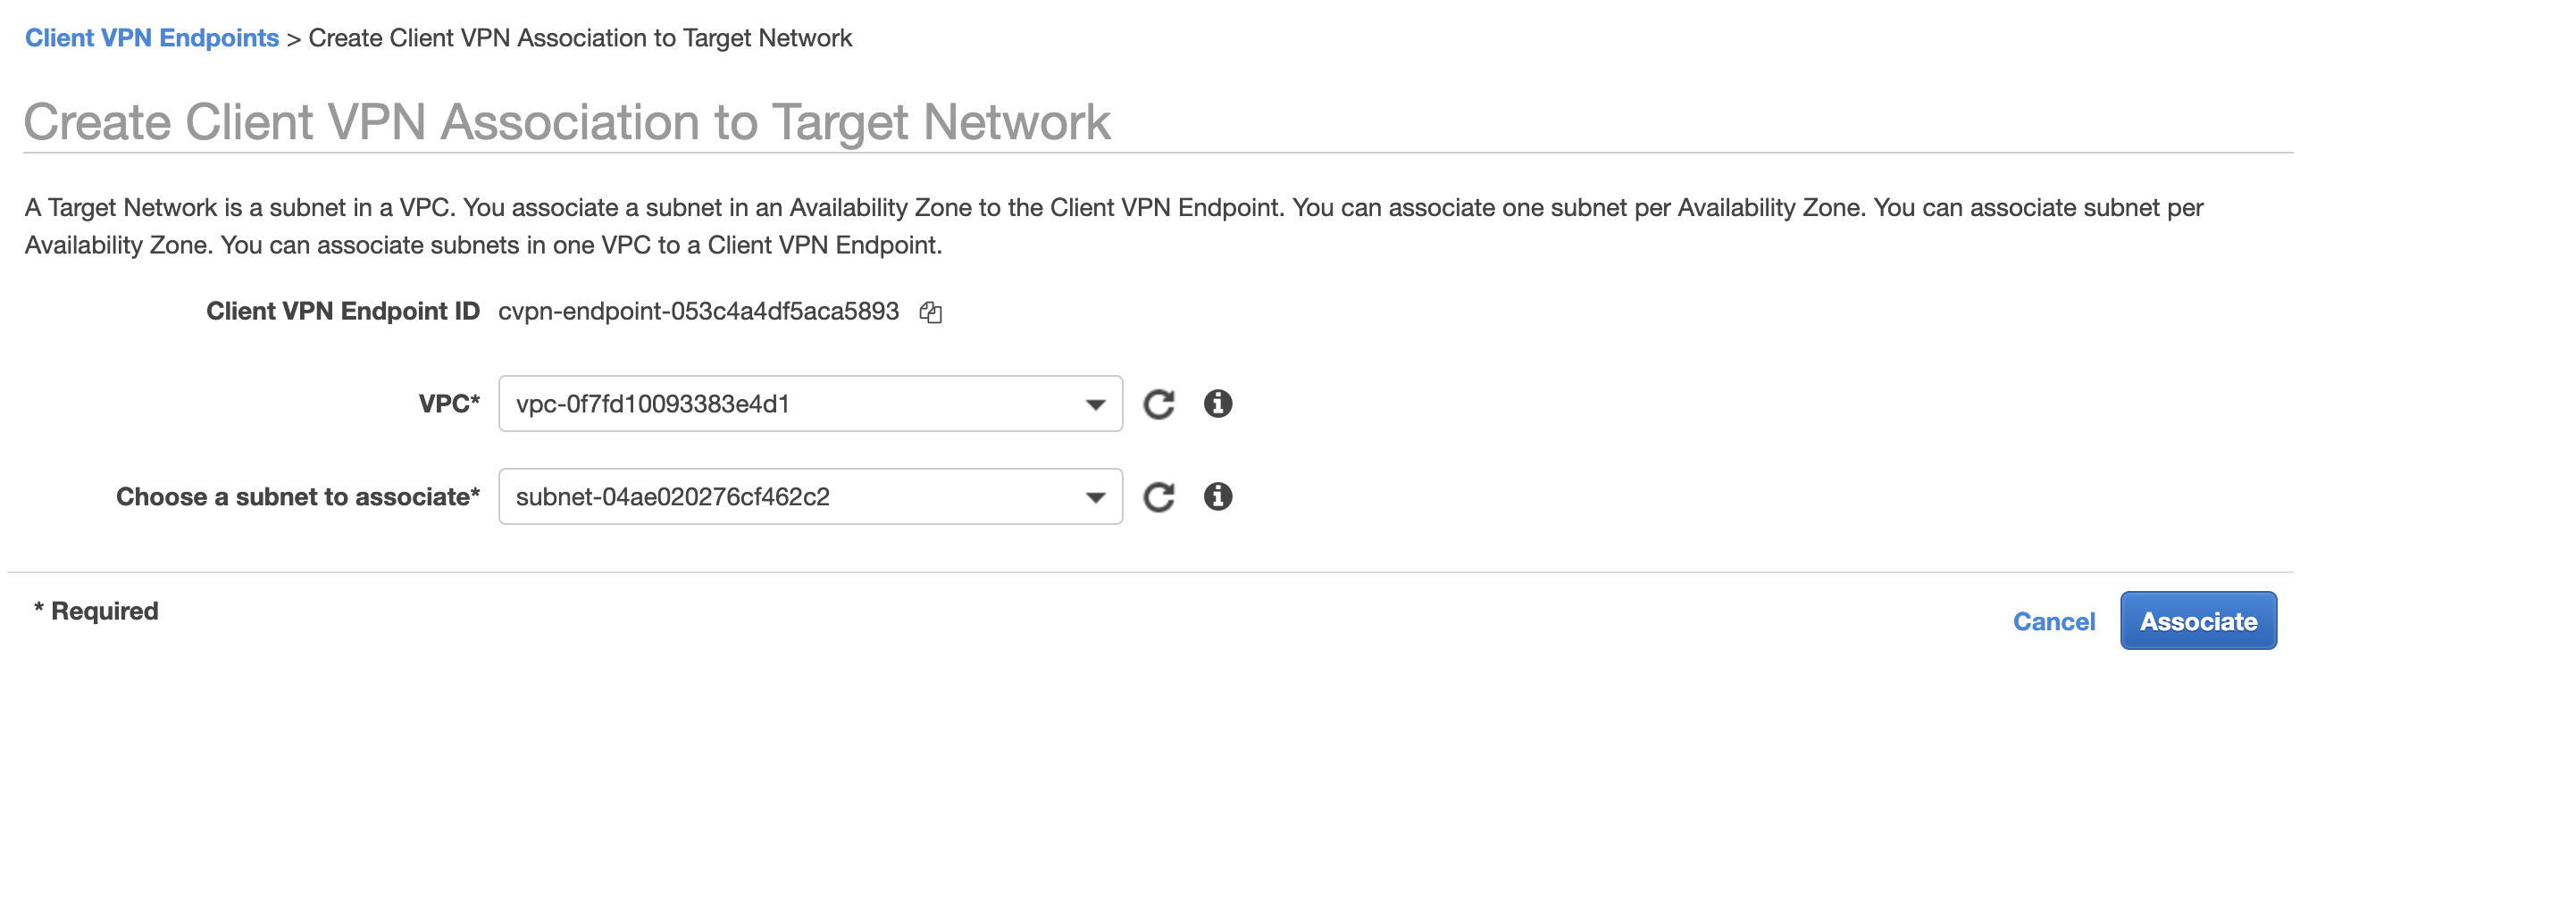
Pending Associate

I repeat the above process to associate the vpn2 subnet which is in a different availability zone to handle possible failure if one AZ goes down. Once I add both, I see their status change to associating.
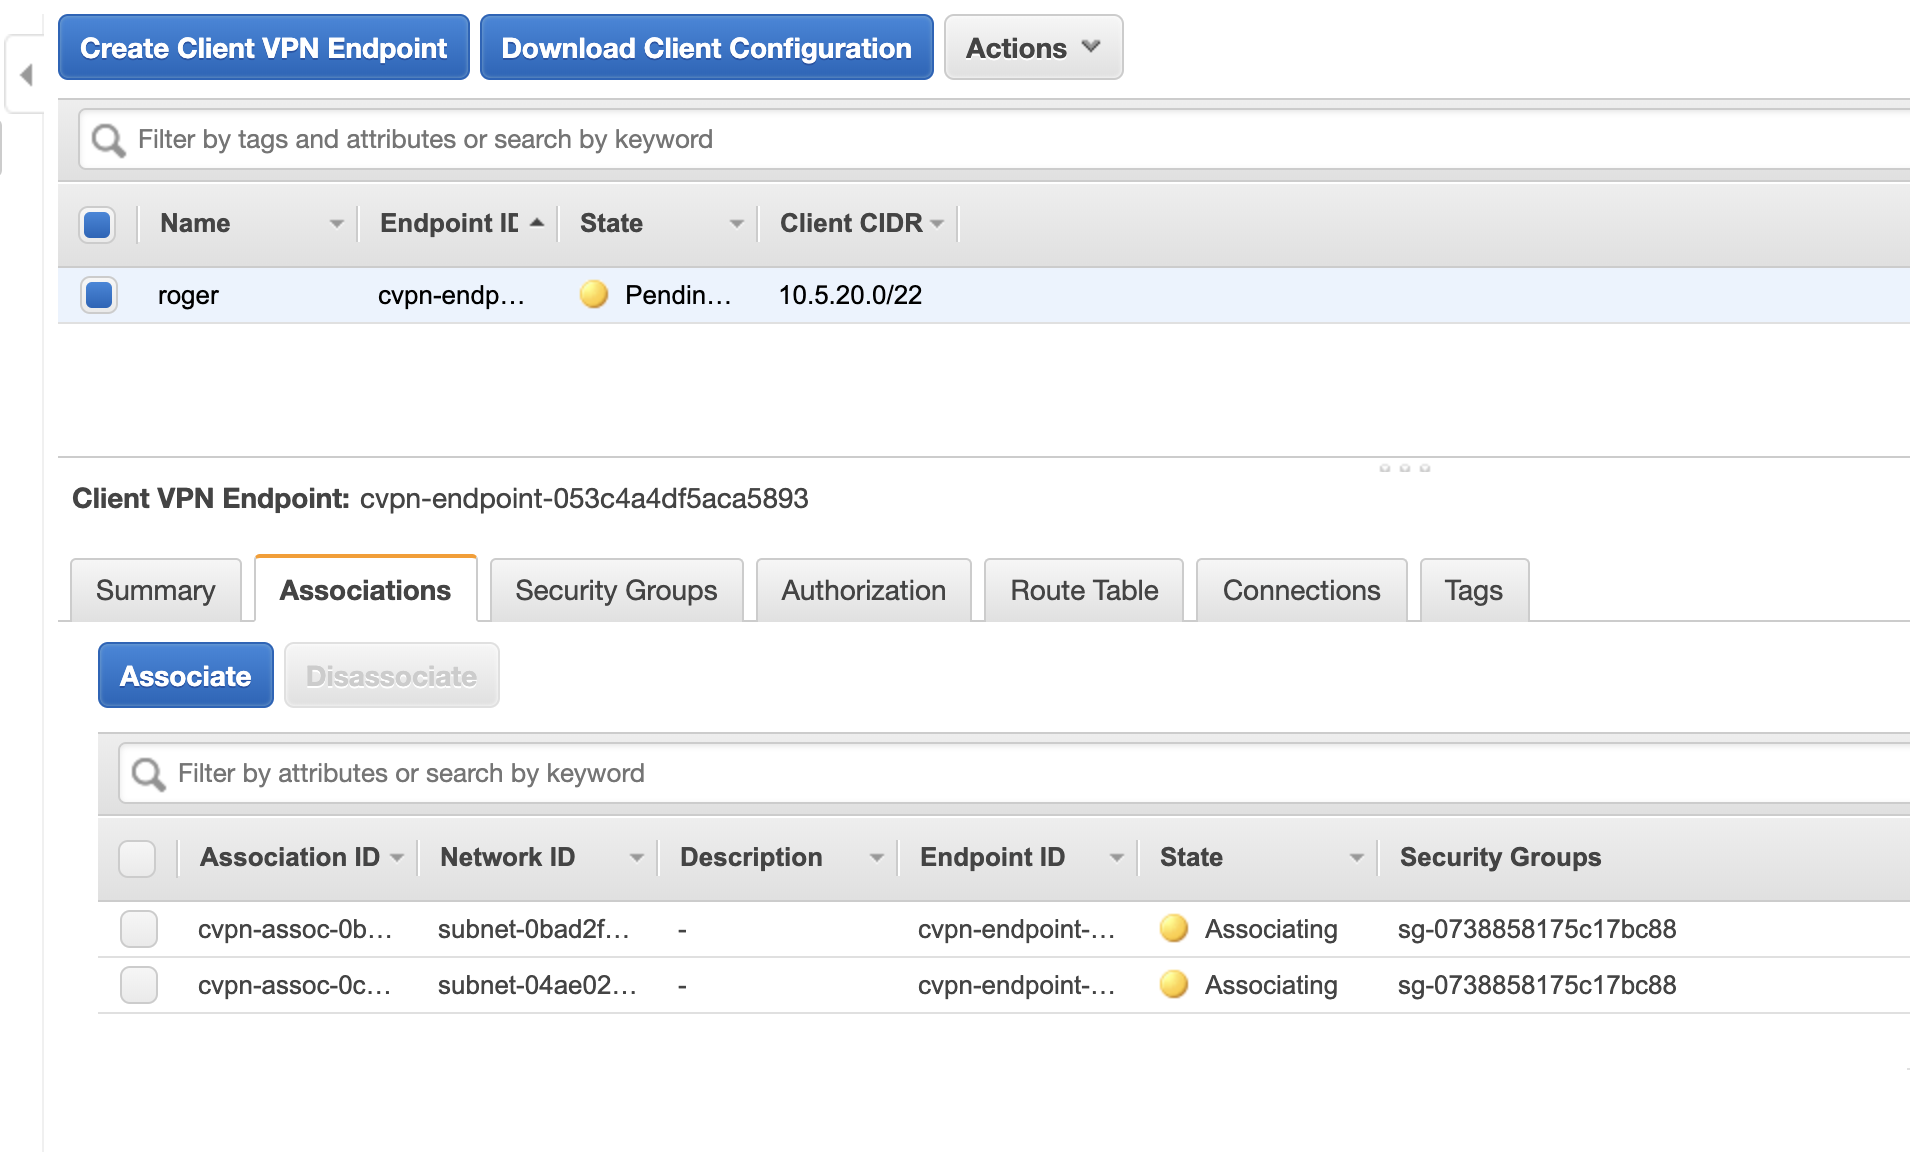
Associating

It may take a few minutes but once the endpoint is sucessfully associated, the yellow associating state should turn green and say Associated.

Associated

Now, I need to add authorization to the endpoint. I click on the Authorization tab (two to the left from the Associations tab) and choose *Authorize Ingress. For my testing purposes, I set access to the entire VPC as follows.

  • Destination network to enable: 10.5.0.0/16
  • Grant access to: Allow access to all users

Authorization Rule

Setting up the .OVPM configuration file

The last step is to download the client configuration file – the .ovpm. At the top of the same Client VPN Endpoints screen, I click the Download Client Configuration. This drops a downloaded-client-config.opvm file in my ~/Downloads folder.

I copy the file to the custom-folder I created earlier.

cp ~/Downloads/downloaded-client-config.opvm ~/stuff/custom_folder/

According to Amazon’s instructions, I need to make two changes to the .opvm file before I install it to OpenVPN client.

  1. Add references to the certificate and keys files into the body of the .opvm file
  2. Add a random string to the front of the DNS name in the .opvm file.

I changeremote cvpn-endpoint-053c4a4df5aca5893.prod.clientvpn.us-west-2.amazonaws.com 443 to remote randomstring.cvpn-endpoint-053c4a4df5aca5893.prod.clientvpn.us-west-2.amazonaws.com 443

I add the following two lines to the end of the file:

cert /Users/roger/stuff/custom_folder/roger.simplyroger.com.crt

key /Users/roger/stuff/custom_folder/roger.simplyroger.com.key

That’s it. I import the file to my OpenVPN client. I use Viscosity, but there are many other choices.

Connecting to the VPN

The moment of truth is here. I go into Viscosity to click to connect to the vpn. It works!

I am connected with the satisfying green status light. But can I see the EC2 instance that I created earlier? I check the private IP of the EC2 which is 10.5.15.34. The private IP is only accessible from within the VPC network. If I am not tunneled into the vpc, I won’t be able to connect to this IP.

I set up two test cases.

  • Ping the EC2 IP
  • ssh to the EC2
ping 10.5.15.34
PING 10.5.15.34 (10.5.15.34): 56 data bytes
64 bytes from 10.5.15.34: icmp_seq=0 ttl=254 time=106.015 ms
64 bytes from 10.5.15.34: icmp_seq=1 ttl=254 time=180.781 ms
64 bytes from 10.5.15.34: icmp_seq=2 ttl=254 time=162.107 ms
64 bytes from 10.5.15.34: icmp_seq=3 ttl=254 time=206.175 ms
^C
--- 10.5.15.34 ping statistics ---
4 packets transmitted, 4 packets received, 0.0% packet loss
round-trip min/avg/max/stddev = 106.015/163.769/206.175/36.831 ms
roger@Mac-Mini-Pro custom_folder % ssh -i ~/.ssh/simplyroger.pem ec2-user@10.5.15.34
The authenticity of host \'10.5.15.34 (10.5.15.34)\' can\'t be established.
ECDSA key fingerprint is SHA256:BWnHAu46zdfHpZZjJ2ZyG/K1Dd9DiTcr/vZHN3Grr34.
Are you sure you want to continue connecting (yes/no)? yes
Warning: Permanently added '10.5.15.34' (ECDSA) to the list of known hosts.

       __|  __|_  )
       _|  (     /   Amazon Linux 2 AMI
      ___|\___|___|

https://aws.amazon.com/amazon-linux-2/

Both work. I get a response back from the EC2 instance from its private IP and can ssh into the instance.

Conclusion

There are a few extra steps to configure a client VPN connection with mutual authentication than Active Directory. I think if I had many users or were already using AD, I’d implement that authentication method. For a few users, the extra steps to generate the keys is less effort than maintaining an Active Directory instance.

Overall, I’m pleased with the setup and not needing an OpenVPN server anymore.

Thanks, AWS and thank you for reading.
Blogging: Take 3

This blog has remained dormant for over a year. It feels like a good time to pick it back up and to start writing again in earnest.

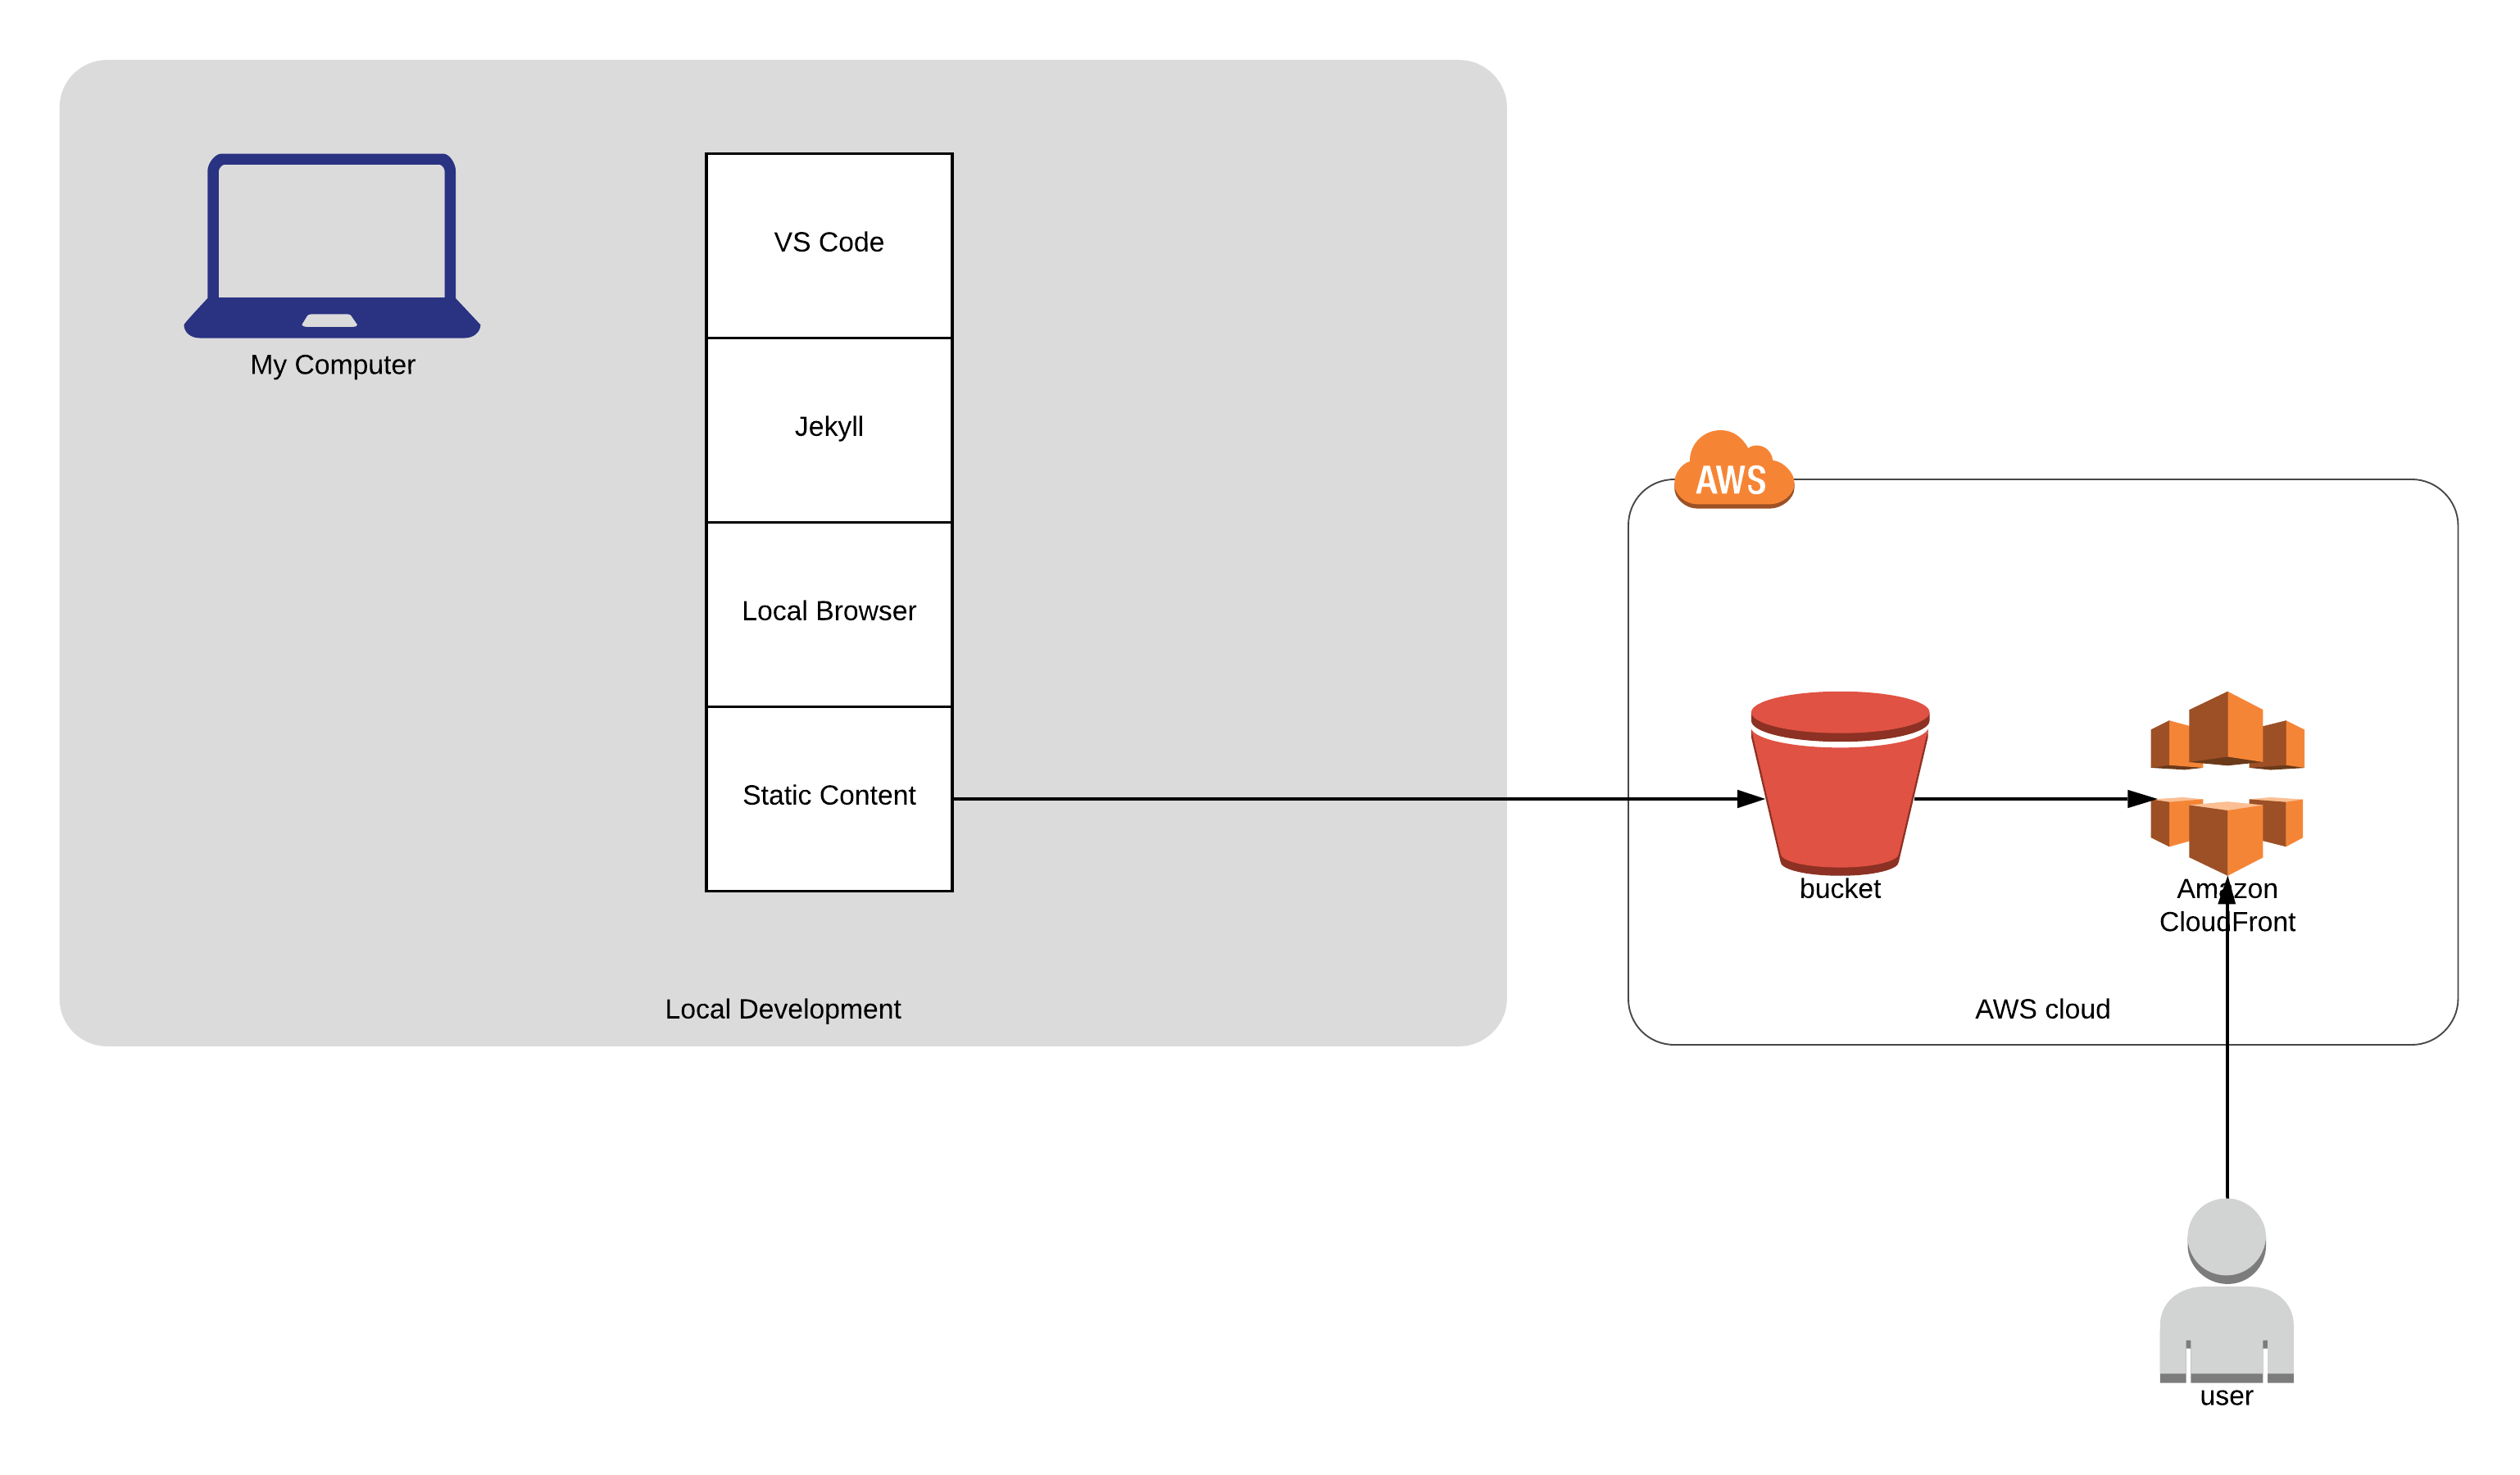
One change I’m making is my tooling and publishing workflow. My last blogging iteration used WordPress. This time around, I thought I’d try something simpler and use Jekyll. Let’s start with a picture:

Blogging Flow

All of the writing takes place in my favorite IDE, VS Code. I write posts in markdown rather than HTML, further using additional Jekyll markup to make conditionals, themes, and other bits easier. I preview all changes locally via a web browser running on a local port. When I am satisfied with the results, Jekyll does the heavy lifting converting my musings into static assets. I upload these static assets to an AWS S3 bucket where my blog is served out via a CloudFront CDN.

This saves me time and money. I now only pay for the CDN and S3 storage rather than for the compute and DB resources needed to keep a CMS like WordPress running. It saves me time as I don’t have to patch or maintain my WordPress install or worry about WordPress exploits.

This method works for my software developer nature. If I run into anything crazy or interesting in my use of Jekyll, I’ll mention it here. If you think you may want to try out Jekyll, take a look at Mike Dane’s intro videos. If you are a Jekyll expert and have some times, please leave them in the comments.

Happy Blogging!

Backup Strategy

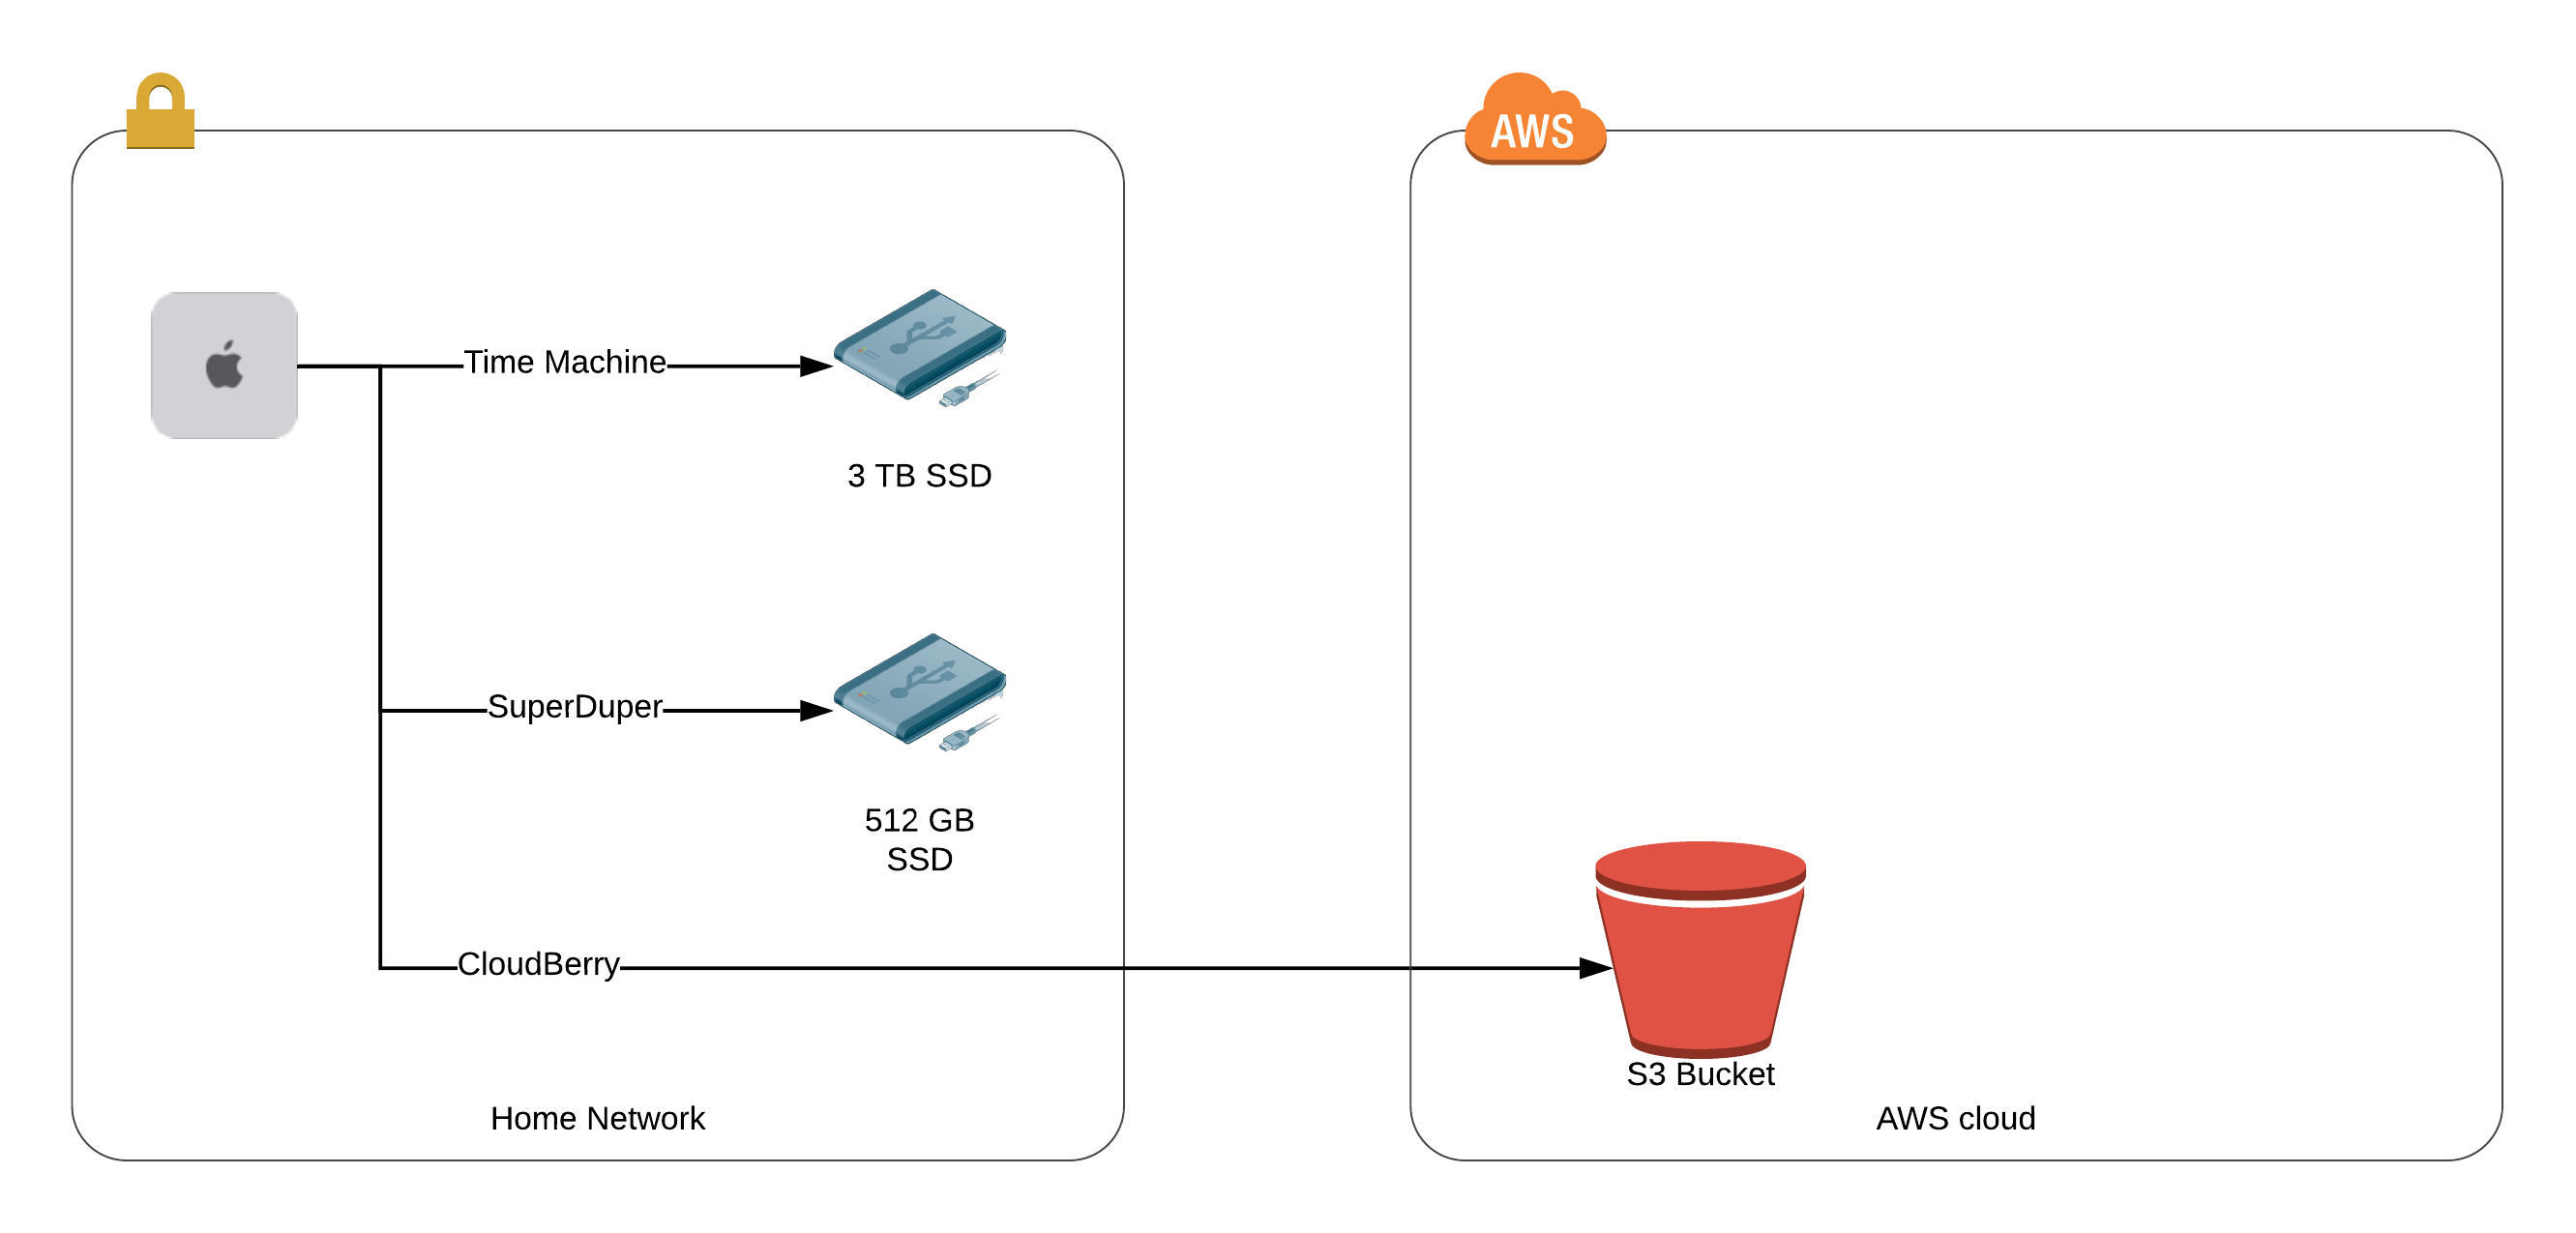
I thought since I’ve been asked a few times about my backup strategy that I would share it here. Let’s start with a diagram and then we’ll walk through it.

backup diagram

My Device

My daily driver is a 2018 Mac mini and I am all-in on the Mac ecosystem. My backup solution is tailored to macOS from a home with a high-speed internet connection.

First Level Backup - Drive Imaging

What I wanted to solve here is a way to get back up and running if my internal disk suddenly fails even if all the data isn’t completely up-to-date. To solve this, I turn to a bootable disk image.

To accomplish this, I need two things. 1) An externally attached disk and 2) the software to mirror my internal drive and make the copy bootable.

The drive that I’m using for imaging is a Samsung T5 Portable SSD - 500GB. You need a drive that is the same in size to your internal storage and nothing larger. There is no value in buying a larger size drive. So, don’t bother spending the extra money. I decided to go with an SSD rather than a spinning disk for the mirroring for speed and because SSD’s have greatly dropped in price.

I am not sure when I first turned to SuperDuper, but it has to have been over a decade. I needed a way to image a drive for an earlier version of macOS. I did a Google search and found Shirt Pocket and their software; it worked flawlessly for my needs. Eventually, I moved beyond the free version which opened up a scheduler, Smart Update, few other extra features that I haven’t yet used. The scheduler is needed to set up automatic nightly updates and the software’s Smart Update feature allows the daily updates to run without reimaging the entire disk each time greatly speeding up the processing time.

Now that I have the drive and the software to create the bootable disk image copy, the only thing left is to set up the scheduler. I run nightly at 4:00 AM. Within 2-3 hours, it is complete and have a bootable copy. Of course, 4:00 AM may not be the best time for you. Choose an overnight time when you will not likely be around as the software does slow when backing up.

At this point, I have a bootable disk image updated daily. I could just stop here and have a pretty good backup solution.

But I didn’t…

Second Level Backup - Hourly Incremental

In addition to the daily bootable backup with SuperDuper, I run Time Machine backups. Time Machine is Apple’s built-in archive solution that keeps not only a complete disk backup but incremental hourly updates. It even goes a bit further by keeping multiple versions of archived files. The versioning, though, is merely a bonus. If you accidentally saved some changes to a Pages document and then realized you wanted the version from 12 hours ago, you’ve got that option. This versioning is not something to depend on like svn or git, however. As backup disk space runs out, older versions and backends are automatically truncated to keep the full backup in place.

The backups work as such: hourly for the past 24 hours, then daily for the past month, then weekly thereafter. The amount of older data Time Machine keeps is based on the Time Machine volume size. Here is where you want 3x or more storage for the drive and not equal size to your disk. Since, again

Why did I go with Time Machine when there are many other choices out there? What am I trying to achieve with the second level backup?

  • Easy to implement
  • Not expensive $$
  • Hourly updates
  • Good level of backups (hour, daily, weekly, monthly)
  • Locally stored
  • Under my control

Time Machine comes free and out of the box with MacOS. Its default configuration provides hourly, daily, weekly and monthly backups. It is a few clicks to set up. The data never leaves my desk.

There are a couple of choices on what type of drive to use or how to connect. I went with a Toshiba HDTB330XK3CB Canvio Basics 3TB USB drive that I had lying around and connected it to the 2018 Mac mini directly. If you have more machines to backup, a larger disk on the local network might the better choice, but since I had the drive sitting around, it worked for me.

Now, what about off-site backups?

Third Level Backup - Cloud Backup

The one thing I don’t have at this point is an offsite backup. What I wanted here was an easy tool to backup my most important files to the cloud.

The first question I had to answer was what files do I want to upload to a cloud hosting service? Since cloud storage has a monthly storage cost attached to it and my ISP’s upload speed is not nearly as good as my download speed (For those of you wondering, I get about 400/25), I want to be picky about what gets backed up remotely.

I chose the following folders to backup:

~/Desktop
~/Documents
~/Pictures
~/Important\ Stuff

I’d recommend adding any other folders of user-created content that can’t be retrieved if your house burns down. This doesn’t mean your Applications folder since you can restore that from Apple’s Mac App Store or from downloading again from the publisher’s website.

The next question is where do I put all this important stuff? I chose Amazon Glacier. It is cheap long term storage in Amazon’s cloud with high durability. It is completely under my control and I can decide if I wish to encrypt the data with my keys before uploading or not. As for price, I think I pay somewhere between $5-6 per month for multiple TBs of data. For full pricing, take a look at Amazon’s pricing page.

The final question I asked was what tool do I use to get this important to stuff to Amazon Glacier? I found Cloudberry Backup for Mac to solve this problem. Why did I choose Cloudberry Labs?

To use Steve Gibson’s phrase of TNO: Trust No One approach to security, this software package ticks off the boxes.

  • The software leaves me in control of what I am backing up and to where that data is going.
  • I choose the compression
  • I choose the encryption at rest
  • and it allows for HTTPS/TLS encryption during transit
  • I choose the final cloud destination be it S3/Glacier, Google Cloud or Azure.

Beyond that, the software is a breeze to configure but if you run into issues, Cloudberry’s support pages or contacts will solve your unique issues.

Notes

I didn’t include a HOW-TO with pretty screenshots to implement these backup options but just described the strategy here. If anyone wants a step-by-step, let me know in the comments and I’ll work on it. There are already many good references for each of these applications out there and I don’t think I could improve upon them.

Warning

Please, test your backups with restores.

  • Boot from the SuperDuper drive. Does it boot correctly with all the data seemingly in place?
  • Open up and dive into Time Machine. Look at some file history. Grab a file. Can you open and read it?
  • Login to S3 and verify the files exist in Glacier. Pull a file back? Can you open and read it?

Taking backups is fantastic but if you can’t get the data back because of corruption, backups are pointless.

I would suggest testing at least every six months to confirm all is healthy.

Conclusion

This three tiered backup implementation might be overkill for most, but it gives me the peace of mind I need and provides an optimal solution to get back up and running quickly in the event of various types of data loss.

You may decide to just go with the bootable disk image, just time machine, or just an online solution like Carbonite or Blackblaze. You may pick two of the three. You may be paranoid like me and do all three. Start with one and increase based on your needs.

Happy Backups!

Reading: 99 Bottles of OOP

Friends and family often ask me what I am currently reading. I am not sure if I could do any book justice with a full and thoughtful review, but I can post a “I am currently reading” post and hopefully finish up with a “my take” upon completion.

I have started reading 99 Bottles of OOP by Sandi Metz.

I caught Sandi Metz’s presentation at Laracon Online in February and immediately supported her efforts by buying her book. Sadly, my time management schedule just recently afforded me the time to begin reading it.

A bathoom smart speaker - Sonos PLAY:1

My use case is fairly simple. I want something that will play podcasts, Audible, and Apple Music while I am getting ready for the day. I want something loud enough to hear clearly while the showering is running and something that can handle handing off between devices when I start on the speaker but want to finish on my iPad or iPhone. As a bonus, I am looking to find something that claims moisture resistance. This speaker would sit on my bathroom counter, after all.

My first solution was to use my iPhone. It is not ideal as the iPhone speaker just isn’t loud enough while the shower is running to clearly hear the words from Audible or my favorite Podcasts.

I have an Apple HomePod in my home office and I find it an excellent speaker. Before, I run out and add another HomePod to my bathroom, I am hoping to find a less expensive solution. Enter the Sonos PLAY:1. Looking at the specs, it felt like it would meet all of my bathroom speaker needs at less than a $200 price point. It even had the phrase “designed to be moisture resistant” in its specs. So, like I do when I order most things, I went to my Amazon Prime account and clicked Buy Now.

This won’t be a full review of the Sonos PLAY:1. There are much better reviews out there and I am far from an audiophile. I can say that setting up the speaker was easy after downloading the Sonos app and creating a Sonos account. The sound quality is fantastic. I don’t think I can say it is better than the HomePod, but I can’t say it is worse. I can say it is significantly better than the Google Home and Amazon Echo smart speakers I’ve had in the past.

One checkbox down.

My next concern was volume while in the shower. Not a problem. Of course, anyone else in my home might not appreciate the volume level, but no problem hearing the speaker over the shower noise.

Two checkboxes down.

The final concern was keeping my place in my currently playing podcast or Audible audiobook. This is where Sonos failed for me. AirPlay 2 isn’t out yet and this speaker claims it will work with AirPlay 2 once released from Apple. In the meantime, one has to use the Sonos app to play podcasts or audiobooks. Audible worked fairly well since it was built-in as a Sonos app and didn’t need to go through the phone to play. However, podcasts via my iPhone and the Sonos app were disappointing.

Third checkbox up (ok, not checked).

Let me explain. 1) I can not play video podcasts. Yes, I understand that playing video through a speaker isn’t possible, but why not play the audio from the video podcast at least? It isn’t a huge deal to workaround but requires me to subscribe to both the audio and video streams of identical podcasts. 2) The big issue for me is if I do not finish any given episode, I have to find where I left off on the Apple Podcast App when switching back to my iPhone or iPad. There is no handoff between the Sonos podcast app and the baked in Apple Podcast app.

Since I bought this speaker to be primarily my podcast player, this was disappointing. I also knew that when Airplay 2 comes out this should no longer be an issue.

Jump ahead two weeks. The first world annoyance of having to sync my place in a podcast between using the Sonos app and Apple Podcast app caused me to return the speaker. In a way, I fell bad that this one lack of feature was the deciding factor even though I knew it will be most likely solved in a few months. Starting podcasts only to lose my place when I left that room wasted a lot of my time. I want something that can do the hand off cleaner and didn’t want to wait for the Air Play 2 release.

I’ve ordered a second HomePod and am eating the extra cost for this one feature.

My recommendation to everyone else is if this isn’t a big deal to you, then the Sonos Play:1 is the better choice. If it is a concern and waiting for AirPlay 2 isn’t a problem, I suggest waiting for that feature release. For me, I wanted it now and decided to give Apple my money to meet my requirements.